

Installing an Above Ground Pool Skimmer: Step-by-Step Guide
To ensure the longevity of your above-ground pool and protect it from debris, it is important to properly install an above-ground pool cover. This step-by-step guide will walk you through the process, making it easy and efficient. Start by thoroughly cleaning the pool and removing any debris. This will ensure that the cover doesn’t trap dirt or leaves, keeping the pool clean and ready for use when the warmer weather rolls around again. Once the pool is clean, carefully unfold the cover and position it over the pool, making sure it is centered. Gently stretch the cover across the surface of the pool, ensuring that it completely covers the water. Secure the cover by attaching any provided clips or ropes to the pool’s edge, creating a snug fit. This will prevent the cover from blowing away in strong winds.
Closing the pool for the winter season is an important task for any above ground pool owner. In addition to installing an above ground pool cover, there are a few other steps that should be taken to ensure the pool is properly closed and protected during the colder months. One important aspect of pool closing is taking care of the pool skimmer. The skimmer plays a vital role in keeping the pool clean by collecting debris and maintaining the water level. Before closing the pool, it is crucial to clean the pool skimmer thoroughly. Remove any leaves, sticks, or other debris that may have accumulated in the skimmer basket. Additionally, it is a good idea to inspect the skimmer for any signs of damage or wear and tear. If the skimmer is damaged, it may need to be repaired or replaced before closing the pool for the season.
• Thoroughly clean the pool and remove any debris before installing the cover
• Carefully unfold the cover and position it over the pool, ensuring it is centered
• Gently stretch the cover across the surface of the pool to ensure complete coverage
• Attach provided clips or ropes to secure the cover to prevent it from blowing away in strong winds
Other steps for properly closing an above ground pool:
• Clean and inspect the pool skimmer before closing for winter
– Remove any leaves, sticks, or debris from the skimmer basket
– Check for any signs of damage or wear and tear on the skimmer
By following these steps, you can ensure that your above ground pool is properly closed and protected during colder months. Installing a high-quality cover will not only keep your pool clean but also extend its lifespan by preventing damage from debris or harsh weather conditions. Taking care of necessary maintenance tasks like cleaning and inspecting the skimmer will further contribute to keeping your pool in good condition while it’s not in use.
Proper Techniques for Closing an Above Ground Pool
Closing an above ground pool at the end of the season requires proper techniques to ensure its longevity and protect it from harsh winter conditions. One important step is to consider replacing the above ground pool liner if it shows signs of wear and tear. A worn-out liner can lead to leaks and other problems during the winter months, so it’s crucial to inspect and replace it if necessary. By replacing the liner before closing the pool, you can prevent any potential issues and ensure a smooth and hassle-free reopening in the next season. Additionally, if you have noticed any issues with the above ground pool skimmer such as cracks or damage, it is essential to address them before closing the pool. A damaged skimmer can cause further problems when the pool is not in use, so it’s advisable to replace the skimmer if needed. By taking the time to replace the above ground skimmer, you can avoid potential complications and ensure optimal functionality when you reopen the pool in the future. Lastly, don’t forget to protect your above ground pool skimmer with a cover. A skimmer cover acts as a barrier against debris and prevents any unwanted materials from entering the skimmer during the winter months. This simple yet effective step can help prolong the life of your skimmer and keep it in excellent working condition. Remember, by following these proper techniques for closing an above ground pool, including above ground pool liner replacement, above ground pool skimmer replacement, and using a skimmer cover, you can maintain and protect your pool, ensuring many seasons of enjoyment to come.
• Consider replacing the above ground pool liner if it shows signs of wear and tear
• Inspect and replace the liner before closing the pool to prevent potential issues
• Address any issues with the above ground pool skimmer such as cracks or damage
• Replace the skimmer if needed to avoid further problems during winter months
• Protect your above ground pool skimmer with a cover to keep debris out
• Using a skimmer cover can help prolong the life of your skimmer
• Following these proper techniques can maintain and protect your pool for many seasons
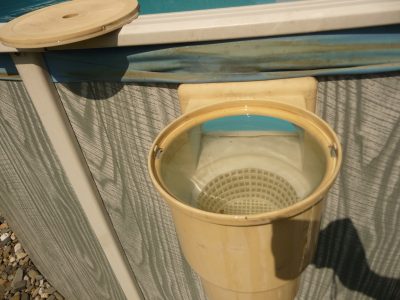
Understanding the Importance of a Pool Skimmer
A pool skimmer may seem like a small and inconspicuous part of your above ground pool, but its importance cannot be overstated. The skimmer plays a crucial role in keeping your pool clean and free of debris. It serves as a primary line of defense against leaves, insects, and other unwanted materials that can accumulate on the surface of the water. Without a functioning skimmer, these contaminants would sink to the bottom of the pool, making it much more difficult to clean and maintain.
Over time, however, your above ground skimmer may experience wear and tear or develop a leak. When this happens, it’s important to address the issue promptly to prevent further damage. Skimmer replacement or repair should be done as soon as you notice any signs of malfunction, such as reduced suction or a noticeable leak. Ignoring these issues could lead to more significant problems down the line and potentially affect the overall cleanliness and functionality of your pool. So, stay vigilant and take proactive steps to keep your pool skimmer in top condition.
• A pool skimmer is essential for keeping your pool clean and free of debris.
• It acts as a primary defense against leaves, insects, and other unwanted materials that can accumulate on the surface of the water.
• Without a functioning skimmer, these contaminants would sink to the bottom of the pool, making it harder to clean and maintain.
• Over time, an above ground skimmer may experience wear and tear or develop a leak.
• Promptly addressing any issues with your skimmer is important to prevent further damage.
• Signs of malfunction include reduced suction or a noticeable leak.
• Ignoring these issues could lead to more significant problems in the future and affect the overall cleanliness and functionality of your pool.
The Basics of a Swimming Pool Skimmer
An essential component of any swimming pool system is the skimmer. Whether you have an above ground or an in-ground pool, the skimmer plays a crucial role in maintaining the cleanliness of the water. If you’re considering above ground skimmer replacement or in-ground pool skimmer replacement, it’s important to understand the basics of how a pool skimmer works.
The skimmer is typically located on the side of the pool, near the water’s surface. Its primary function is to remove debris from the pool, such as leaves, insects, and other floating particles. This is accomplished through a combination of mechanical and filtration processes. As water flows into the skimmer, it passes through a basket or filter, which traps larger objects. The filtered water is then sent to the pool pump for circulation. If you notice any issues with your above ground pool pump hook up or if your above ground pool pump is leaking, it’s advisable to check the condition of your skimmer as well.
• The skimmer is an essential component of any swimming pool system, whether it’s above ground or in-ground.
• It is located on the side of the pool, near the water’s surface.
• Its primary function is to remove debris from the pool, such as leaves, insects, and other floating particles.
• The skimmer uses a combination of mechanical and filtration processes to accomplish this task.
• As water flows into the skimmer, it passes through a basket or filter that traps larger objects.
• The filtered water is then sent to the pool pump for circulation.
• If you notice any issues with your above ground pool pump hook up or if your above ground pool pump is leaking, check the condition of your skimmer as well.
Step-by-Step Guide to Replacing an Above Ground Pool Liner
When it comes to replacing an above ground pool liner, there are a few key steps to follow. First, you’ll want to remove the existing liner by carefully peeling it away from the pool walls. Make sure to disconnect any hoses or attachments from the pool skimmer box before proceeding.
Once the old liner is removed, it’s time to inspect the condition of the pool walls. If you notice any damage or corrosion, it may be necessary to repair or replace the above ground pool wall before proceeding with the liner installation. Additionally, this is a good time to review the condition of the above ground skimmer box. If it shows signs of wear or damage, consider a pool skimmer replacement above ground to ensure optimal functionality.
After addressing any necessary repairs, it’s time to install the new liner. Start by positioning the liner in the pool and ensuring it is centered and level. Then, gradually unfold the liner, smoothing out any wrinkles or creases as you go. Once the liner is in place, it’s important to properly hook up the above ground pool pump and filter to ensure the water circulation and filtration system works effectively. This step will help maintain the cleanliness and clarity of your pool water.
• Carefully peel away the existing liner from the pool walls
• Disconnect any hoses or attachments from the pool skimmer box before removing the liner
• Inspect the condition of the pool walls for any damage or corrosion
• Repair or replace above ground pool wall if necessary before installing the new liner
• Review the condition of the above ground skimmer box and consider replacement if needed
• Position and center the new liner in the pool, ensuring it is level
• Gradually unfold and smooth out any wrinkles or creases in the liner as you go
• Properly hook up and connect your above ground pool pump and filter to ensure effective water circulation and filtration system
• Maintain cleanliness and clarity of your pool water
DIY: Above Ground Pool Skimmer Replacement Made Easy
Replacing an above ground pool skimmer can seem like a daunting task, but with the right approach, it can be a straightforward DIY project. Before starting, gather all the necessary tools and materials, such as a replacement skimmer, pool skimmer line, pool skimmer screws, and above ground pool skimmer gasket replacement. Begin by turning off the pool pump and closing the pool’s main drain. Then, remove the pool skimmer lid and disconnect the pool skimmer line from the pool pump. Carefully remove the skimmer from the wall, ensuring not to damage any surrounding pipes or fittings. Inspect the skimmer for any cracks or damage, as this may be the cause of the issue. Once the damaged skimmer is removed, the replacement process can begin.
Begin the installation process by applying a thin layer of silicone or pool-safe adhesive around the opening of the skimmer. This will help create a watertight seal once the new skimmer is in place. Align the new skimmer with the existing opening in the pool wall and attach it securely using pool skimmer screws. Once the skimmer is securely in place, reconnect the pool skimmer line and tighten the connection. Double-check that all connections are secure and properly sealed to avoid any leaks. With the new skimmer successfully installed, it’s now time to test the system. Turn on the pool pump and check for any leaks around the skimmer or connections. If everything is working properly, you can now enjoy a fully functioning swimming pool skimmer and peace of mind knowing that you completed the replacement process on your own.
• Gather all necessary tools and materials before starting the skimmer replacement
• Turn off the pool pump and close the pool’s main drain
• Remove the pool skimmer lid and disconnect the skimmer line from the pump
• Carefully remove the old skimmer from the wall, avoiding damage to surrounding pipes or fittings
• Inspect the old skimmer for cracks or damage that may have caused issues
Installation Process:
– Apply a thin layer of silicone or pool-safe adhesive around the opening of the new skimmer
– Align and securely attach the new skimmer using pool skimmer screws
– Reconnect and tighten the pool skimmer line connection
– Double-check all connections for security and proper sealing to avoid leaks
Testing:
– Turn on the pool pump
– Check for any leaks around newly installed skimmer or connections
Enjoyment:
– If everything is working properly, enjoy a fully functioning swimming pool with peace of mind knowing you completed it yourself.
Troubleshooting Common Issues with Above Ground Skimmers
When it comes to troubleshooting common issues with above ground skimmers, there are a few key areas to focus on. One common problem is the deterioration of above ground pool gaskets. Over time, these gaskets can wear down and become less effective at creating a tight seal. This can lead to water leaking out of the skimmer, causing a decrease in the pool water level. To resolve this issue, it is important to regularly inspect and replace any worn or damaged gaskets. By ensuring a tight seal, you can help prevent water loss and maintain the proper functioning of your above ground pool skimmer.
Another common issue that may arise is the need for a new pool skimmer. If you notice that your current skimmer is not effectively removing debris from the pool water, it may be time for a replacement. Consider investing in a high-quality above-ground pool with skimmer filter that is specifically designed to efficiently remove leaves, dirt, and other debris from the water. By upgrading your skimmer, you can ensure that your pool water remains clean and clear, minimizing the need for extensive maintenance and manual cleaning.
• Regularly inspect and replace worn or damaged gaskets to maintain a tight seal
• Prevent water loss by ensuring the skimmer has a proper seal
• Invest in a high-quality above-ground pool with skimmer filter for efficient debris removal
• Upgrade your skimmer to keep pool water clean and clear
• Minimize the need for extensive maintenance and manual cleaning
Protecting Your Above Ground Pool Skimmer with a Cover
When it comes to protecting your above ground pool skimmer, one of the most effective ways is by using a cover. Not only does a cover provide a layer of protection against debris and leaves, but it also helps to prevent any damage to the skimmer itself. Whether you have just installed a new pool skimmer or are looking to prolong the lifespan of your existing one, investing in a cover is a smart choice.
To ensure maximum protection, it is essential to choose a cover that is specifically designed for your above ground pool skimmer. This will ensure a proper fit and provide the best possible coverage. Additionally, when installing the cover, it is important to pay close attention to the pool skimmer gasket installation. The gasket acts as a seal between the skimmer and the pool liner, preventing any water from leaking through. By properly sealing the skimmer, you can minimize the risk of a leaking skimmer in your above-ground pool. Remember to follow the manufacturer’s instructions carefully when installing a skimmer on an aboveground pool to ensure a secure and watertight connection.
• Choose a cover that is specifically designed for your above ground pool skimmer
• Ensure a proper fit and provide the best possible coverage
• Pay close attention to the pool skimmer gasket installation
• The gasket acts as a seal between the skimmer and the pool liner
• Prevents any water from leaking through
• Properly sealing the skimmer minimizes the risk of a leaking skimmer in your above-ground pool
• Follow manufacturer’s instructions carefully when installing a skimmer on an aboveground pool
Tips for Repairing a Leaking Skimmer
If you notice that your pool floor skimmer is leaking, it is important to take immediate action to prevent further damage and ensure the proper functioning of your above-ground pool intake system. One common cause of a pool skimmer leak is a cracked or damaged skimmer basket. Start by inspecting the basket for any signs of cracks or holes. If you find any, it is recommended to replace the skimmer basket with a new one specifically designed for your pool model. This simple fix can help prevent water from seeping out of the skimmer and causing damage to the surrounding area.
Another potential issue that may lead to a leaking skimmer is a damaged or worn-out skimmer gasket. The skimmer gasket provides a watertight seal between the skimmer and the pool wall. Over time, this gasket can deteriorate due to exposure to harsh pool chemicals and the elements. To fix a leaking skimmer caused by a faulty gasket, start by turning off the pool pump and emptying the water from the skimmer. Carefully remove the skimmer faceplate, being cautious not to damage it. Inspect the gasket for any signs of wear or damage, and if necessary, replace it with a new one. By properly maintaining and repairing the skimmer components, you can ensure a watertight seal and prevent any future leaks in your pool skimmer.
• Inspect the skimmer basket for cracks or holes
• Replace the skimmer basket with a new one designed for your pool model
• This simple fix can prevent water from seeping out and causing damage
• Check the skimmer gasket for wear or damage
• Turn off the pool pump and empty the water from the skimmer
• Carefully remove the skimmer faceplate without damaging it
• Replace the gasket if necessary to ensure a watertight seal
By following these tips and properly maintaining your pool’s skimmer, you can effectively repair any leaks and prevent further damage.
How to Replace an Above Ground Skimmer: A Step-by-Step Guide
Replacing an above ground skimmer can be a straightforward process if you follow these step-by-step instructions. Start by draining the pool water below the skimmer level to ensure a dry working area. Carefully remove the skimmer lid and basket, taking note of their position for later reassembly. Disconnect the skimmer from the pool wall by removing any screws or bolts that secure it in place. Once the skimmer is detached, carefully pull it out from the pool wall, making sure not to damage the surrounding liner.
Next, thoroughly clean the area around the skimmer opening, removing any debris or old adhesive. Measure and cut a piece of replacement liner that matches the dimensions of the skimmer opening. Apply a generous amount of adhesive to the back of the liner and carefully position it over the opening, smoothing out any wrinkles or bubbles. Allow the adhesive to dry according to the manufacturer’s instructions.
Once the new liner is secure, it’s time to reinstall the skimmer. Align the skimmer with the opening and gently push it back into place, ensuring that the liner is properly sealed around the edges. Use screws or bolts to secure the skimmer back onto the pool wall, making sure it is tightly secured. Finally, reattach the skimmer lid and basket, double-checking that they are positioned correctly. Refill the pool with water, and your newly replaced above ground skimmer should be ready to use.
By following these step-by-step instructions, you can easily replace an above ground skimmer and ensure the proper functioning of your pool. Remember to take your time, follow all safety precautions, and consult a professional if you encounter any difficulties. With a little patience and effort, you can maintain a clean and well-maintained pool for years to come.
• Drain the pool water below the skimmer level to create a dry working area.
• Remove the skimmer lid and basket, taking note of their position for later reassembly.
• Disconnect the skimmer from the pool wall by removing any screws or bolts that secure it in place.
• Carefully pull out the skimmer from the pool wall, being careful not to damage the surrounding liner.
• Clean the area around the skimmer opening, removing any debris or old adhesive.
• Measure and cut a piece of replacement liner that matches the dimensions of the skimmer opening.
• Apply adhesive to the back of the liner and carefully position it over the opening, smoothing out wrinkles or bubbles.
Allow adhesive to dry according to manufacturer’s instructions.
• Reinstalling: Align and gently push back into place ensuring proper sealing around edges.
• Securely attach using screws or bolts onto pool wall. Double-check tightness.
• Reattach skimmer lid and basket making sure they are positioned correctly.
• Refill with water and your newly replaced above ground skimmer is ready for use!
What is a pool skimmer?
A pool skimmer is a device that is installed in an above ground pool to remove debris and leaves from the water’s surface.
Why is a pool skimmer important?
A pool skimmer is important because it helps to keep the pool clean and free from debris. It also helps to improve the circulation of water in the pool.
How can I tell if my pool skimmer needs to be replaced?
Signs that your pool skimmer may need to be replaced include cracks or damage to the skimmer basket, loss of suction, or a pool that is not staying clean despite regular maintenance.
Is it possible to repair a pool skimmer instead of replacing it?
In some cases, it may be possible to repair a pool skimmer instead of replacing it. However, if the skimmer is severely damaged or old, it is often more cost-effective to replace it.
How long does it take to replace a pool skimmer?
The time it takes to replace a pool skimmer can vary depending on the specific situation and the skill level of the person performing the replacement. Generally, it can take a few hours to complete the replacement process.
Can I replace a pool skimmer myself, or should I hire a professional?
It is possible to replace a pool skimmer yourself, especially if you have some experience with basic pool maintenance. However, if you are unsure or uncomfortable with the process, it is recommended to hire a professional to ensure the job is done correctly.
How often should a pool skimmer be replaced?
The lifespan of a pool skimmer can vary depending on factors such as the quality of the skimmer and how well it is maintained. On average, a pool skimmer may need to be replaced every 5-10 years.
Can I still use my pool while the skimmer is being replaced?
If you are replacing the skimmer yourself, it is recommended to drain the pool before beginning the replacement process. This means that you will not be able to use the pool until the replacement is complete.
Are there any additional steps I should take to protect my pool skimmer?
To protect your pool skimmer, it is recommended to use a pool skimmer cover when the pool is not in use. This can help prevent damage from weather, animals, and debris.
What should I do if I notice a leak in my pool skimmer?
If you notice a leak in your pool skimmer, it is important to address it as soon as possible. You can try to tighten any loose screws or replace any damaged o-rings. If the leak persists, it may be necessary to replace the skimmer.